

Afternoon all
I'm replacing an old B and Q light fitting with a new one from the same source, but I'm slightly stumped.
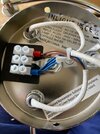
There are two light switches in the room, one at each door, so presumably this makes the wiring slightly more complicated. So could someone please explain to me how I transfer the cables from the old fitting into the new fitting, thanks.
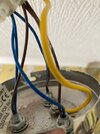
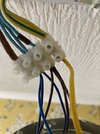
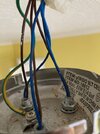
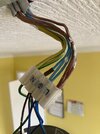
First four pics are the current wiring arrangement of the old fitting, and the last pic shows the connection block on the new fitting.
Thanks in advance, further pics to follow if needed.
I'm replacing an old B and Q light fitting with a new one from the same source, but I'm slightly stumped.
There are two light switches in the room, one at each door, so presumably this makes the wiring slightly more complicated. So could someone please explain to me how I transfer the cables from the old fitting into the new fitting, thanks.
First four pics are the current wiring arrangement of the old fitting, and the last pic shows the connection block on the new fitting.
Thanks in advance, further pics to follow if needed.
")
